So You Want To Be A Pixel Artist?
My name is Tsugumo, and this is what I know.
Chapter 14: The Faster You Move, The More You Can Do
A brief update: Chapter 12 marks the start of a new set of tutorials, 4 years after Chapter 11 was completed. I've learned a lot since the old chapters, and I now know the answers to questions I had back then...as well, some of the information from older chapters is not necessarily "wrong", but not the way I understand or do things now. The previous chapters are still solid resources, but in the new chapters I'll be correcting some of the things I feel need changing. Keep in mind though, that the best thing you can do to get a solid understanding of pixel art is to read all the chapters, from the first through to the last instead of just skimming through little bits that seem interesting at a glance. I tend to go off on tangents and get sidetracked easily because I have a lot to explain, so a chapter will often cover more than what its title describes. Now then, let's begin...
At the time of writing this, I've been in the game industry for 8 months. I work at a small company where essentially I'm doing a ton of work solo. Along the lines of doing all or a major amount of art for multiple cel phone games at the same time by myself, working on all the character sprites for a Nintendo DS game solo, etc. Basically I have to pump out a ton of work as fast as possible. Before this, I never really had deadlines aside from weak self-imposed ones that I often didn't follow because there really were no consequences. I started my job bright-eyed and bushy-tailed, ready to spend all day doodling up rough ideas, sketching them out, scanning, retracing, all that fun stuff...My current schedule is a new 64x64 character with an idle (4 frames), walk cycle (6 frames), and two attacks (6 frames each), in 3 directions, every 4 days. That's 66 frames in 4 days, or 16.5 frames a day. That's a lot. These are unique, pre-designed characters, so I can't just make a base body and alter parts of it to create a new character (I'm talking a giant mech that clanks around, a big beast that sprints, a little human that strolls along, etc.). Now I'm faster than most people when it comes to pixel art...I've been doing this stuff for a long time and most of it is second nature to me now...but even so, I quickly learned that to even attempt to meet these deadlines, I was going to have to skip any steps I could skip, and streamline the ones I couldn't, to come up with the most efficient process I could.
My current process is to spend, at the most, 5 minutes roughing out animation ideas for a character. If I'm working from a reference, I'll break it down into major shapes (say it's a fat monster wearing bulky armor, the rough is going to be like, a circle for the general belly shape of the guy, rough angled shapes for the shoulder armor, circle for a head, etc., nice and simple) and just get an idea of how the character will move. I start with roughing out an idle pose, and then I do up the 6 poses for the run. These are simple drawings because there's no reason to do any detail...I'm not going to be retracing these later. And when I rough them out in pixels, this is similar to what the pixelled rough will look like (general shapes forming the character that I can tighten up later). From there, I go right into Photoshop and get to working with pixels. Nowadays, I don't even use my Wacom drawing tablet, I just do everything with the mouse. That's a personal preference, but I find that when I'm working this small, I can get the shapes out faster by using the mouse and some hotkeys (to switch/grab colors and to change the size of my brush). I didn't even have a drawing tablet till well after I wrote the first bunch of tutorials, so I guess I'm just used to the mouse for pushing pixels.
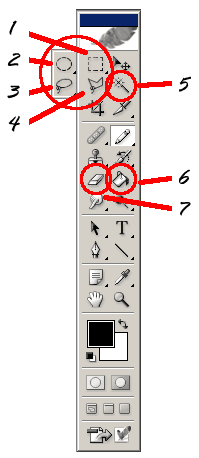
Back in the day, I used a program called Autodesk Animator Pro, and I've tried out a zillion other programs over the years...but nowadays, Photoshop is the only program I use for pixel art...it's popular, it's everywhere, and while it's not built for pixel art, it can be set up to work for it. Plus there are a lot of tricks in Photoshop you can use to save yourself time and create things you'd have a difficult time creating in simpler programs. When I sit down at a computer with a new version of Photoshop installed, the first thing I do is go through the toolbar on the left, like so:

1) Rectangular Marquee Tool: "Feather" should be set to 0, and "Anti-aliased" should NOT have a checkmark. For reasons I don't understand, the "Anti-aliased" setting may be greyed out so you can't touch it, so you have to do the Elliptical Marquee Tool first, which'll change the setting on this one.
2) Elliptical Marquee Tool: Same thing, "Feather" and "Anti-aliased" set to 0 and unchecked. These are BAD things for pixel art.
3) Lasso Tool: "Feather" to 0, "Anti-aliased" unchecked. Seeing a pattern?
4) Polygonal Lasso Tool: "Feather" to 0, "Anti-aliased" unchecked. I really don't use more than these four selection tools, but any tools you use that have these options, turn them off.
5) Magic Wand Tool: Set "Tolerance" to 0, "Anti-aliased" unchecked.
6) Paint Bucket Tool: "Opacity" to 100%, "Tolerance" to 0, "Anti-aliased" unchecked.
7) Eraser Tool: Set "Mode" to "Pencil" (the Pencil Tool is your friend for pixel art...it's what gives you solid pixel blocks instead of blurry anti-aliased airbrushed looking stuff...so you want the Eraser set to Pencil mode so when it erases, it erases solid pixel blocks instead of blurry anti-aliased airbrushed looking stuff), "Opacity" to 100%.
8) Go to "Select" up in the "File, Edit, etc." bar, and choose "Color Range". Make sure the "Fuzziness" setting is ALWAYS set to 0. You might have to select something with it set to 0 for it to "lock" at 0.
9) The opacity on your tools when you're drawing should always be set to 100%...In Photoshop, there's a hotkey thing where if you hit the numbers 1 through 9, or 0, it'll change your opacity instantly (10, 20, 30...100). That's fine and dandy when you know about it and mean to hit the keys...but there've been a handful of occasions where I'll have accidently hit the 9 key and be drawing at 90% which looks the same as 100%, but is actually screwing up all of my colors...so when I go check my color count at the end, I'm using well over 256 colors and going "??? What the...??" This is such a pain...I didn't even realize there WERE hotkeys for it till after I had done this a few times, heh. Learn from my mistakes.
Alright, now you're good to go. Photoshop has a ton of little tricks to it that can save you time...some important hotkeys you'll want to learn to use are:
[ and ] - The square brackets...these enlarge and reduce the size of the brush you're using. I use this a lot when I start blocking out a character's shape.
X - Switches the Foreground and Background colors. When I'm laying lines down on a silhouette to get my sprite's lineart, I'll usually have the silhouette as a faded blue color on a layer, then make a new layer above it, fill it with white, set it to Multiply (which will make the white transparent, but black will show up), and draw my black lines, erasing them quickly by hitting X to switch from black to white. There's a little double-square beneath the Foreground and Background color boxes, which instantly defaults them to Foreground Black, Background White.
SHIFT + CTRL + C - I didn't even realize this existed until just recently, but it's been in there since like, Photoshop 4, and I had no idea...this would've saved me a ton of time. This is "Copy Merged", and basically if you select an area and CTRL + C, you'll only get the stuff in that area on the layer you're currently working on. But Copy Merged will grab everything you visually see in that area, regardless of what layer it's on. I used to duplicate and flatten the layers to do this...it was ridiculous, heh. I tend to work on a lot of layers, especially when I'm testing out movements, so if something looks wrong I can just delete or tweak the layer and I'm back to what I had before, or the layer's in a better position...so this feature helps us layer-jugglers.
B - Switches to the Pencil Tool. I use this in conjunction with:
E - Switches to the Eraser Tool. If I'm working on a layer and doing color work so I can't use the Multiply trick from up above, I need to switch between Pencil and Eraser quickly...combine that with [ and ] for changing the sizes of the brushes depending on what I need, and I'm hitting keys pretty much constantly.
SHIFT + CTRL + I - Inverse Selection...Say I've got a character on a blue background. Now I want to draw on that character but not all over the background...I select the background (with Select Color Range, or the Magic Wand) and then Inverse Selection and kaboom, the character is selected.
CTRL + ALT + Z - "Step Backward", aka MULTIPLE UNDOS. Lifesaver. I don't even really use the normal CTRL + Z Single Undo anymore. A little trick you can use if you want to see how things look "before and after" is say you have a face. Now you click 4 times, drawing pixels on the face. You want to flip back and forth between the old face and the new face to compared them. You can Step Backward 4 times, then hit CTRL + Z, and it'll undo your stepping backwards, so when you hit CTRL + Z repeatedly, it'll switch from the final version to the old version. I've seen people using this, and it's alright, but when I make changes, I do them on a new layer so I can just toggle the layer's visibility on and off. I find that stepping backwards takes more time, even if it's just hitting the keys 4 or 5 times VS clicking the mouse once...it all adds up, in my mind, and I'm shooting for being as fast as possible with this stuff.
CTRL + E - "Merge Down". I use a lot of layers, like I'll have a face and want to tweak it's expression, so I'll make a new layer and do my tweaking there, then flip the layer on and off to see if I like my changes, so when I decide "alright, I like these changes", I can hit CTRL + E and merge my new layer down to the original one, and I've got my new version of the face.
ALT + Backspace - Fill with Foreground Color. If nothing's selected, it'll fill the entire layer with the foreground color (even if there's stuff on the layer). If you have an area selected, whether it's one big intricate shape, or a bunch of small shapes around the layer that aren't even touching, this'll fill all of those areas in with the foreground color.
CTRL + Backspace - Fill with Background Color. Same thing, but with the background color. I mainly use these two to fill selected areas...like if I'm working on a spell effect so I have, say, a blue lightning bolt shape drawn on a layer, I can select that and ALT/CTRL + Backspace it to a different color. Or if I have a character fully done and I decide "hmm, the shade on his arm should be a bit darker...", I can Select Color Range that shade, switch to a slightly darker one, and ALT/CTRL + Backspace it and that color is changed. This is also great for reducing colors in your sprite...if you find you're at 17 colors when you have a limit of 16, you can Select Color Range the white areas and grab a light yellow area's color, then ALT/CTRL + Backspace and the white areas are now the light yellow.
ALT + Left-click while using the Pencil or Paint Bucket Tools - Instant Eyedropper Tool. An EXTREME time saver. I use this constantly, at all stages of development. It's a million times faster to just grab a color on the sprite that's near your cursor than to go click on the Foreground Color button and choose that color. A lot of people will, as they add colors to their sprite, put squares up in a corner of each of those colors so they can grab those colors quickly (like a painter having pools of paint on his palette to dab his brush into)...I have no problem with this method, and it's great for keeping organized, and when you first start with pixel art it helps you get used to having only X number of colors in your palette and keeps you from getting carried away making new colors and such...but I find it's slower to 1) Make those boxes in the first place, 2) Erase them when you're done, and 3) Move the mouse all the way over to one of those boxes instead of just a few pixels over to a part of the sprite that has the color I want. It only saves a few seconds at most, but again, over time it can add up.
CTRL + Clicking a layer in the Layers Window - This'll select whatever's on that layer, basically anything that isn't transparent pixels...So if you've made a new layer, drawn a face on it, and you can see a body on the layer beneath it, and both face and body use the same skin color, but you want to change that skin color on just the face...CTRL + Click the face layer, which selects the face only, then Select Color Range the skin color, and it'll only select the skin color within that face selection.
ALT + CTRL + Click on a layer in the Layers Window - This'll "cut out" whatever's on that layer from an area you have selected. So again in the face/body example, you could select the whole screen, and then ALT + CTRL + Click the face and now the face is "cut out" from the selection so if you Select Color Range the skin color, it'll just select the skin color on the body and leave the face alone. I use very intricate selection methods as I work, using everything from the Magic Wand, to Select Color Range, to chopping out or adding bits and pieces of selection. Remember that Select Color Range will select the color you tell it to but only WITHIN a selected area (or the whole image if nothing is selected)...it's very powerful, especially when you're altering colors you don't like anymore, or working on palette swaps of a character.
CTRL + H - Hide a selection...I use this for clarity sake, so I can see what I'm doing. It just hides those marching ants.
CTRL + D - Deselect whatever's selected. Nice and quick way to deselect stuff when you're done with it. I could go to Select, Deselect, but that's wasted time, especially since I use Deselect a LOT. I don't use Inverse Selection all that often...I could do that via a menu and not notice a difference in time...but I deselect after pretty much every selection, and I select often.
CTRL + S - Use this. All the time. In any program for anything. You only lose work so many times before you figure this out...I hit CTRL + S every 10 - 20 clicks, I kid you not. As I'm typing this CTRL + S description, I've saved 3 times. Now 4. Yeah, maybe it's excessive, but having to redraw or retype things wastes time, and as long as saving doesn't take more than an instant (can't really do this if you're working with a billion layers on a huge image and saving is a 2 minute process), there's no reason not to quickly push CTRL down with the ridge of your left hand and hit S with your left ring finger...you don't even have to leave the homerow position to do this.
And those are the main hotkeys I use...Now keep in mind that this is purely MY setup. I'm not saying these methods are the best way to do things...like I have no problem with having your palette as squares in a corner for quick reference. Me, I personally don't use it, but other people do and for them it's a good method...they might even be faster with that than I am with my method, so like I say, nothing against it...I'm just explaining how I do things and what I've found works for me. Also, regarding hotkeys, I know they're scary at first, especially when you're new to a program, but they'll speed things up for you immensely. I still hate venturing out into using new hotkeys because I waste time hitting the wrong key or forgetting what tool I just switched to or what-have-you, but I try to force myself to leave that comfort zone of clicking on things and do it because I know it improves speed. I still do wasteful things like clicking on the Paint Bucket tool instead of just hitting G to switch to it, but that's a habit I know I should break if I want to be more efficient.
I also set up a New Window for my work...So I'll have the main window, which I make most of the screen and zoom into (usually between 800% and 1600%), and then I go to "Window, Arrange, New Window For ProjectName" (it might be different depending on your version of Photoshop, but the option is there somewhere) and have a tiny 100% sized version of the workspace off to the right. This way I can edit up close, but glance at the 100% sized version to see how the final piece will look.
For animation, I use a program called GIF Movie Gear. It's nice and simple, loads pretty much instantly because it doesn't have a billion useless features (ImageReady, I'm looking at you...), imports .PSD files with every layer as a new frame (so when I animate, I just make each new frame a new layer), allows you to quickly delete and shift around frames (so I can have a .PSD file full of different versions of frames and delete the bad ones as soon as I get it into Movie Gear), and set time delays and such on multiple frames at a time. It doesn't have a lot of features, but it has pretty much everything I need, and has it in a nice efficient form. I like minimalist programs that focus on one thing and on doing that one thing well, so this program suits me. Really, you can use any GIF animation program you can get your hands on...this is just my personal favorite, mainly for the .PSD importing feature. I ran into a program once where I had to save out each layer as an individual file and import them all one at a time and it was just such a pain, and slowed me down severely...ugh. Anyway, while I use Photoshop and Movie Gear for my stuff, you don't have to...you can use anything that works for you, or that's available to you. At the end of the day, while this section of the tutorial is fairly Photoshop-specific, most programs have similar features and art concepts stay the same no matter what program you're using.
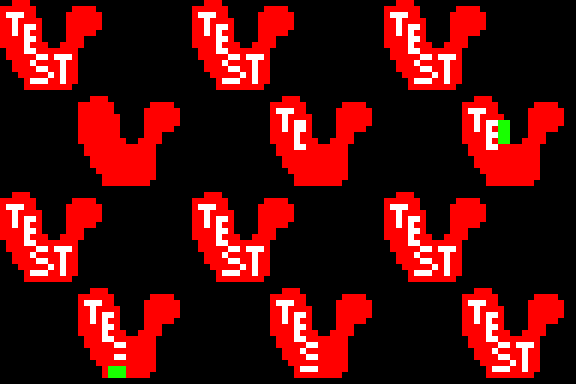
A training exercise I use when I'm working on something that doesn't have a tight deadline is to work with a 4 pixel brush (2x2 pixels) instead of one pixel. Any shape can be created with a 2x2 pixel brush...it takes more clicks, but the point of the exercise is to deduce the least number of clicks you can use as you go. Here's an animated example of this:

Might be hard to follow at first, but the green shows where I draw with the 2x2 brush, and then it's replaced by the color I used. There'd be no green if I was doing this for my own use. This definately takes a lot longer than doing things with the 1x1 brush, make no mistake about that...especially when you get into detailed areas with multiple colors and shading and such. But the point of the exercise is to get your brain thinking about where the best place to put pixels is each step of the way, keeping track of what the shape looks like, estimating what the shape will look like after you place a pixel in spot A, spot B, or spot C, and then deciding the best one to go with, etc. It just helps get your braining functioning on pixel level and thinking faster, because it's sort of like solving a bunch of tiny puzzles as fast as you can. You don't have to do this, I'm just describing one of the ways I train.
Regarding using Photoshop and other programs...there are pixel purists out there who are all about using the most basic means possible to create pixel art. They're still using DOS paint programs and they chastise people for using programs like Photoshop and layers and opacities and crazy selection methods and all that fancy stuff...to them, "real" pixel art is done the way people did it back in the early 90s. Me, I don't care. I say if you want to truly reach your full potential and produce the best work possible, then you use whatever works. Those who fear new ideas and methods get stuck in the old ways and limit themselves...yes, they may still be able to produce amazing work, but there's a chance they could produce even BETTER work if they opened their minds. I'm not saying a person has to embrace every new technique that comes down the line...but I believe a person should at least study that technique, or try it, and decide "Is this useful to me? Does this help me?", and if the answers are "no", then don't use it. Absorb the useful, discard the useless, but study everything to determine which it is.
Back to main...
